Help

A Simple Schema Example

This scenario describes how to create a simple Schema, and describes how to use it in a Port or Workflow.

  • 1. Launch the Schema editor. To create a new  Schema, right click on the  Schemas node in the Blue Integrator Explorer tree, and select New Schema.
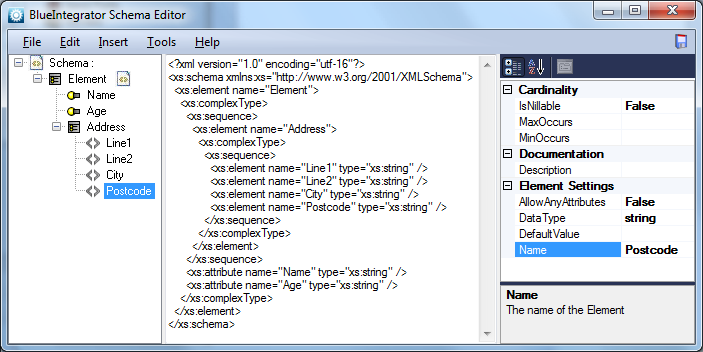
  • 2. Create the Schema in the editor. The editor provides both a tree and an XSD view. We recommend that you create your Schema structure in the tree control using the context or application menu to insert new types, elements and attributes as required. The Properties grid pane on the right allows you to configure the properties for the items selected in the tree. If you require further control though, you can edit the XSD directly.To create a simple Person schema, in the Schema Editor right click on the Schema root in the tree control, and select Create Child Element. Rename this element to Person. Right click on the Person element, and select Create Child Attribute. Rename this to Name. Right click on the Person element, and select Create Child Attribute. Rename this to Age. In the Properties pane, change the data type to xs:int. Right click on the Personelement, and select Create Child Complex Type. Right click on this and add Child Elements for Line1, Line2, City and Postcode.To see an example instance of your schema, select Tools | Generate Sample XMl Document… from the Schema editor menu bar. You can also validate a schema instance using the Tools | Validate XML Document menu option.
  • 3. View or modify Schema level settings. If you click on the Schema root in the tree control, you can specify a number of schema-level settings including the target namespace, any other schemas to be imported or included, and the root element (applicable if you have more than one element defined at the root level, and which can also be set via the context menu). You can also specify an additional XML header to be added to document instances, primarily to allow association with Microsoft InfoPath.
  • 4. Flat-file support. At the Schema settings level you can also designate a schema as flat-file, that is a file that is not XML but is delimited (e.g. CSV) or positional in nature. If the Schema Is Flat File Schema property is set to true, a number of other properties across the schema hierarchy are enabled. At the schema level you can specify whether to ignore superfluous carriage returns and the default encoding. At the type level, you can define delimiters or positional settings for contained items. At the element or attribute level, you can specify additional delimiter and positional data as appropriate.For example, we will create a simple CSV schema relating to a simple CustomerId, ProductCode, Quantity file. An example file might look like this:Customer1,Product1,10
    Customer1,Product2,0
    Customer2,Product1,100
    Customer2,Product2,100
    Create a new Schema. In the editor, select the Schema root in the tree control, and set Is Flat File Schema to true in the Properties pane. Right click on the Schema root in the tree control, and select Create Child Element. Rename this element to Root. Right click on the Root element, and select Create Child Complex Type. Rename this to Record. In the Properties pane, set the Delimiter to {CRLF} from the drop-down. This sets a carriage return / linefeed to be the record delimited (although the default Schema setting of IgnoreCarriageReturns=true will tolerate inconsistencies in the newline format). Set the DelimitMode to Infix_ToleratePostfix. This means that we don’t care whether or not the file finished with a new line. Set MaxContentOccurs to unbounded from the drop-down. This means that there can be multiple instances of the child items. Click on the Record element, and set the Delimiter to , (comma) in the Properties pane. This means that child items of this record will be comma separated. Right click in the Record element and create three child elements in turn, named CustomerId, ProductId, Quantity. Set the data-type of the Quantity element to be xs:int in the Properties pane. Now we can create a sample flat-file document by using the Tools | Generate Sample FlatFile Document menu item.
  • 5. Using the Schema with a Port. A Schema can be assigned to a Port by setting the Schema property on the General tab of the Receive Port Properties form. On setting this property, we are saying that all documents passing through the Port will adhere to this Schema, and an error will be thrown (resulting in a Suspended Message) if an invalid document is submitted. On a Receive Port, we can also specify an Envelope Schema to enable us to extract multiple records from one document, consult the Blue Integrator help file for more information on this.Having selected a Schema, more Port functionality becomes available. Specifically it becomes possible to enter XPath filters, Context Property initialisation expressions, uniqueness criteria and receipt correlations that just aren’t possible without knowing the Message schema.
  • 6.Using the Schema with a Workflow. A Schema can be associated with a Workflow Message (via the Properties pane), and again this is adding an extra layer of validation. It also enables extra functionality when writing code in Visual Studio for Applications. The use of a strongly typed message will enable a member on the VSTA Message accessor called BodyModel. This member exposes a programmatic and strongly typed model of the schema.For example, if you have a Workflow message variable called PersonMessage associated with the Person schema defined earlier, you could write the following code in int age = this.PersonMessage.BodyModel.Person.Age; (C#)ordim age as System.Int32
    age = Me.PersonMessage.BodyModel.Person.Age; (VB.Net)
    Note that if the document is blank or the area of the document you are accessing does not exist, you may get null returned. You can create null areas of the document using the new (New) operator.
  • 7. Parameter schemas. Schemas can be used to describe parameters or return values from WCF or Web Services. In this case, the system will generate programmatic objects that are equivalent in data structure to the Schema specified