Help
Registering Servers
Help menu
- Help content
- AS2
- Examples and Tutorials
- IO Queues and Forms
- Maps
- Schemas
- Send and Receive Ports
- Send and Receive Ports / Transports
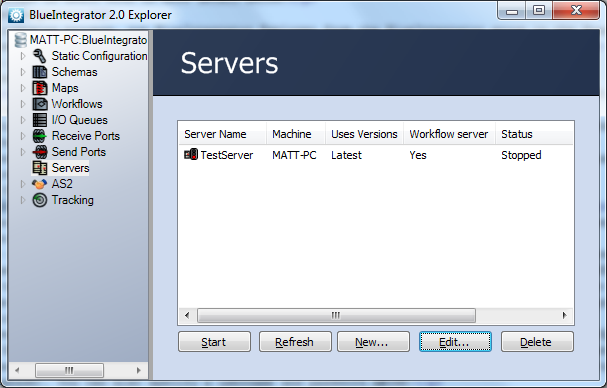
- Servers
- Static Configuration
- Tracking
- Workflows
- Workflows / Workflow Activities
- Call Web Service Direct Activity
- Compensatable Sequence Activity
- Compensatable Transaction Scope Activity
- Compensate Activity
- Conditioned Activity Group
- Database Activity
- Delay Activity
- Event Handling Scope Activity
- Event Driven Activity
- Expression Activity
- Fault Handler Activity
- If Else Activity
- Increment Activity
- Invoke Web Service Activity
- Invoke Blue Integrator Workflow Activity
- Invoke Workflow Activity
- Listen Activity
- Map Activity
- Parallel Activity
- Policy Activity
- Send Receive Port Response Activity
- Replicator Activity
- Send Receive Port Response Activity
- Send Port Message Activity
- Sequence Activity
- Suspend Activity
- Synchronization Scope Activity
- Transaction Scope Activity
- While Activity
If no servers are registered with Blue Integrator when the application launches, you’ll see this warning dialog:
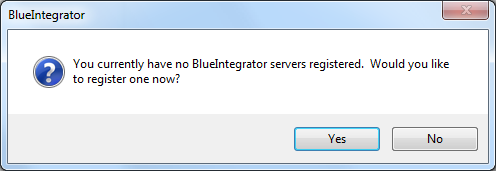
To register a server, click Yes. This will display the Edit Server Properties dialog:
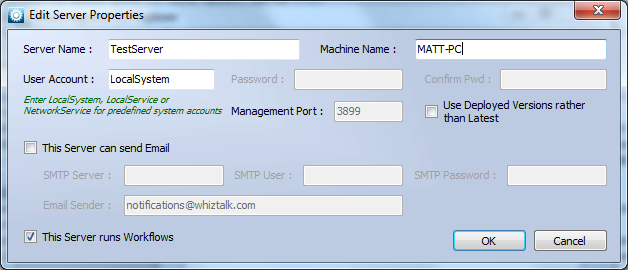
Complete the information on this dialog:
- Server Name: the name used to identify this server in the server list; this name does not have to correspond to the actual server name, but can be descriptive
- Machine Name: the name (identifiable by Windows networking) or IP address of the server
- User Account: the login to be used to this machine (either local or network authentication)
- Password: the password used with the User Account to log in
- Confirm Pwd: enter the password for the User Account twice to prevent typographic errors
- Management Port: the port to be used for managing the server (usually the default value unless ports have been reassigned for security reasons)
- Use Deployed Versions rather than Latest: instructs Blue Integrator to use the deployed version on the target machine instead of any newer versions that have been loaded
- This Server can send Email: if the server is to be used to generate emails check this box and then complete the now active fields:
- SMTP Server: the IP address or resolvable name of the SMTP server the emails are to be sent to
- SMTP User: the user account to which emails are routed
- SMTP Password: the password for the SMTP user account
- Email Sender: the From field email address used in any emails sent by the server
- This Server runs Workflows: if the server being configured runs workflows, then check this box; otherwise remove the checkmark