Help
Adding an I/O Queue
Help menu
- Help content
- AS2
- Examples and Tutorials
- IO Queues and Forms
- Maps
- Schemas
- Send and Receive Ports
- Send and Receive Ports / Transports
- Servers
- Static Configuration
- Tracking
- Workflows
- Workflows / Workflow Activities
- Call Web Service Direct Activity
- Compensatable Sequence Activity
- Compensatable Transaction Scope Activity
- Compensate Activity
- Conditioned Activity Group
- Database Activity
- Delay Activity
- Event Handling Scope Activity
- Event Driven Activity
- Expression Activity
- Fault Handler Activity
- If Else Activity
- Increment Activity
- Invoke Web Service Activity
- Invoke Blue Integrator Workflow Activity
- Invoke Workflow Activity
- Listen Activity
- Map Activity
- Parallel Activity
- Policy Activity
- Send Receive Port Response Activity
- Replicator Activity
- Send Receive Port Response Activity
- Send Port Message Activity
- Sequence Activity
- Suspend Activity
- Synchronization Scope Activity
- Transaction Scope Activity
- While Activity
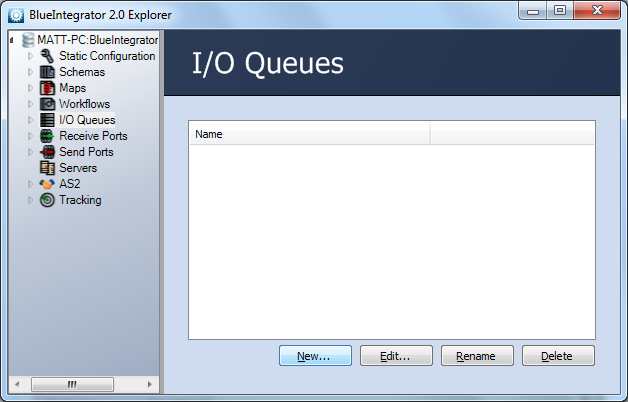
An I/O queue is created through the Blue Integrator Explorer. To create a new ![]() I/O Queue, click on I/O Queues in the Blue Integrator Explorer window, then click on the New button at the bottom of the right pane:
I/O Queue, click on I/O Queues in the Blue Integrator Explorer window, then click on the New button at the bottom of the right pane:
This will display the I/O Queue Properties dialog:
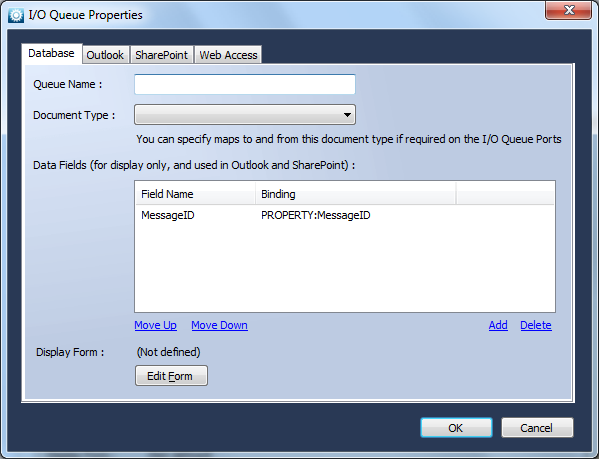
The I/O Queue Properties dialog has four tabs across the top.
The Database tab allows you to enter information about the I/O queue you are creating:
- Queue Name: this is the name that will show up in the Blue Integrator Explorer summary
- Document Type: lets you specify the schema applied to items on the queue. If the schema is not the same as the items that will be received or sent, a Map must be used on the port to convert the format to the proper schema. The same schema must be applied to the received and sent messages.
- Data Fields: these are the fields and their bindings included in the messages handled by the I/O queue. You can add, delete, and reorder the fields using the four links at the bottom of the field list pane. The data fields are essentially named expressions used to display a message when the table view is used.
- Display Form: lets you select the form used to display the message, based on the schema used. Click on the Edit Forms button to enter the Forms Editor.
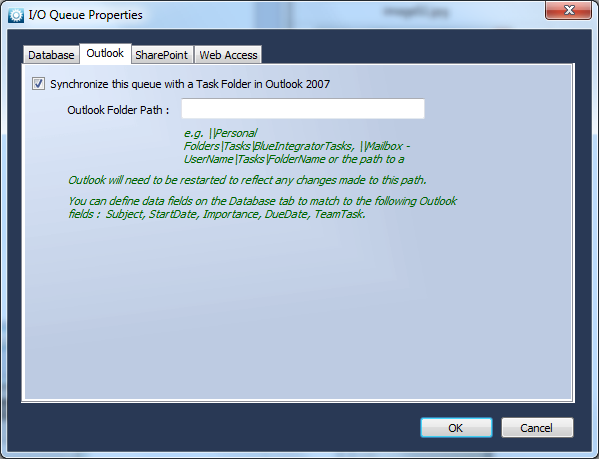
The Outlook tab lets you set whether this I/O queue will synchronize with Outlook. The Outlook Tasks folder is used. If you do want to synchronize this I/O Queue with the Outlook Tasks folder, check the dialog checkbox and enter the Outlook path of the folder (see the example given).
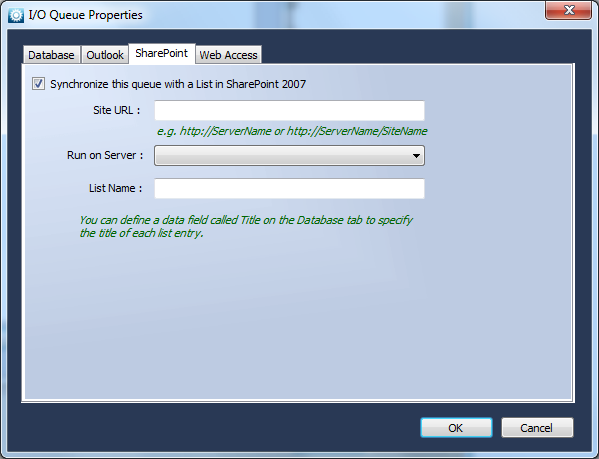
The SharePoint tab lets you indicate whether this I/O queue will be synchronized with a List in SharePoint. If it is to be synchronized, select the checkbox and specify the resolvable URL to the SharePoint list, the server name that will run the synchronization process, and the name of the SharePoint list.
The Web Access tab helps you to connect the I/O queue to a Web Service. For current information please contact support@blueintegrator.com.
