Help

Windows Workflow Basics

Blue Integrator Workflows are sequential Windows Workflows.  A sequential Windows Workflow has clear starting and ending points and execution proceeds from start to finish, one step after the next, following one possible route.

Activities are the building blocks of workflows, and below we run through the key activities in the Windows Workflow framework.


Sequences


The Sequence activity is a very simple composite activity – effectively it wraps a linear sequence of activities into a single activity.  Many activities accept only a single child activity, and the Sequence activity is useful in enabling you to use multiple activities in such cases.


Controlling Flow through Conditions


When conditions are specified in a workflow, the runtime engine evaluates them and then acts based on the result. Two of the core condition-based activities are IfElse and Policy. The IfElse activity works like a classic If statement in a high-level programming language. It may contain any number of condition-based branches and also a default branch to fall into if no other condition is met. The Policy activity, instead, represents a collection of rules. In Windows Workflow Foundation, a rule consists of a condition and one or more resulting actions. Think of a rule as an If-Then-Else statement, where the condition corresponds to the Boolean guard of the If block, and the actions define the behavior of the Then and Else clauses. Let’s get to know more about each of these activities and then compare them.

When added to a workflow, the IfElse activity looks like Figure 1. By default, it has two branches, and new branches can be added by right-clicking and selecting Add Branch from the context menu. When the runtime engine reaches an IfElse activity it begins evaluating the condition of the various branches proceeding from the left to right. The condition of each branch is determined and the first branch that evaluates to true is run. You can alter the evaluation order of the branches by moving branches around through the commands in the activity’s context menu. To enable a branch, you need to specify a valid condition. You specify a condition in either of two ways—through an expression or through a piece of code.

Figure 1 IfElse Activity in Action

If you opt for an expression, set the branch in the designer and give a public home to the Condition entry in the Properties form. Next, expand the expression editor and enter an expression that touches on workflow members and evaluates to a Boolean value. For example, if the workflow class features a variable named MinimumLength you can set the condition as follows:

this.MinimumLength >= 8

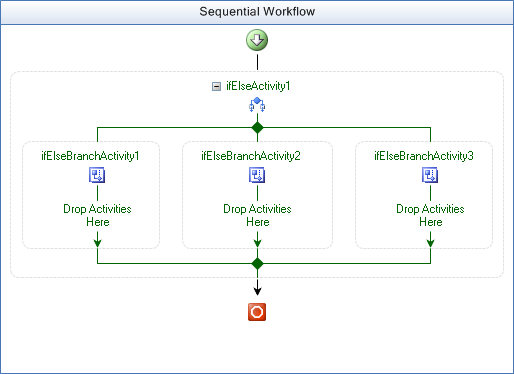
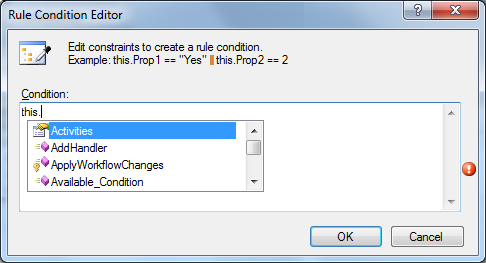
Figure 2 Condition Editor for IfElse Activities

The final branch in an IfElse activity can lack a condition. In this case, it will work as the Else branch of the IF workflow statement.

The second way to specify a condition is through ad hoc code. In this case, you enter a method name and double-click (or press Enter), and VSTA will be launched with a new method named as specified returning a bool.  Edit this code as appropriate to return the appropriate condition value.  You can also select an existing condition method from the drop-down.

IfElse activities can be nested to express complex logic, but the design of the logic remains hardcoded in the workflow. This is good and bad at the same time. It’s a good thing because it allows you to design the workflow exactly as you want and integrate it with the rest of the activities. It’s a bad thing when you need to create a set of rules to initialize portions of the workflow’s state. Having a bunch of IfElse activities only to assign values to internal members of the workflow is clearly overkill.

You should use a combination of IfElse activities when you really need to control the flow of the workflow and orchestrate various blocks of the work. If what you need is just a sequence of programmatic If statements with simple code attached to branches, then you’re better off using a Policy activity. A Policy activity is a collection of rules. The code associated with each rule, though, is limited to setting a property on a workflow or calling a workflow method or a static method on types in referenced assemblies.

The activity is associated with a sorted collection of rules that you define through the editor. Each rule has a priority and an Active property. The combination of the two properties determines whether the rule should be evaluated and with which priority. In addition, a rule must specify a reevaluation behavior—Always (default) or Never. If set to Always, the rule is reevaluated as needed, otherwise it is evaluated only the first time and never changes whatever happens to the workflow’s state.

Instead, the rule set as a whole is subject to forward chaining. Simply put, forward chaining refers to the ability of the actions of one rule to cause other dependent rules to be reevaluated. For example, an action that updates the value of a field that another rule tests requires a reevaluation of the involved rules (unless reevaluation is disabled on the rule).

There are three types of forward chaining.

Implicit chaining indicates that the runtime engine will figure out which fields are modified by some actions and automatically reevaluate them. This mechanism succeeds as long as actions work on properties explicitly. What if you have an action like the following:

IF this.MinimumLength <= 8 THEN RefreshInternalState()

Who knows what the RefreshInternalState method is going to do? The method might touch on workflow properties that are involved with other rules in the policy activity. By using attributes on the method declaration, you can explicitly indicate the behavior of the method:

<RuleWrite(”PasswordLevel”)>
Public Sub RefreshInternalState( )
    Me.PasswordLevel = 1
End Sub

The RuleWrite attribute indicates that the method is going to modify the specified property; likewise, the RuleRead attribute indicates that the method reads from the specified properties. In this way, unequivocal information is provided to the runtime engine to keep the rule set in sync.

Finally, you can write actions that explicitly call out updates on involved properties. Here’s an example:

IF this.MinimumLength <= 8 THEN
    RefreshInternalState()
    Update(”PasswordLevel”)

The Update method in the rule action orders the reevaluation of all rules that include the specified property.

NOTE In Blue Integrator, only methods defined in Visual Studio for Applications for which you have specified the BlueIntegrator.Workflow.MethodVisible attribute will be available for use within the Rule editor.  Note also that you cannot define Properties in Visual Studio for Applications for use in the Rule editor.

Loops and Repeated Activities


The native set of activities provides classic While activity as well as a Replicator activity that has some points in common with a classic For loop. The While activity accepts a condition and evaluates it at the beginning of each iteration. If the condition is true, the activity runs the specified child activity and repeats until the condition becomes false. Note that a single activity is permitted in the body of the While. For this reason, you might want to use a composite activity (that is, an activity that contains other activities) such as Sequence or Parallel to execute multiple activities in the loop. (The term “interleaved” is probably more appropriate than “parallel” here. There is no true concurrency going on with the Parallel activity, only interleavings within the same thread.)

Similar to a Foreach statement, the Replicator activity creates and executes a given number of instances of the specified child activity. You can specify only one child activity, but using composite or custom activities is allowed. You can’t control the number of iterations through a declarative property. Instead, you write a handler for the Initialized event and populate the CurrentChildData collection with initialization data for each of the desired instances:

Public Sub Replicator1_Initialized()
   Console.WriteLine(”Initializing …”)
   Activities.replicator1.CurrentChildData.Add(”You are #1”)
   Activities.replicator1.CurrentChildData.Add(”You are #2”)
   Activities.replicator1.CurrentChildData.Add(”You are #3”)
End Sub

To set the Initialized handler, enter a handler name for the Initialised event property and double click.  Note how activities are referenced from VSTA with an 
Activities. prefix.

The preceding code snippet orders three instances of the child activity of the Replicator, each initialized with a given string. Note that if you leave the 
CurrentChildData collection empty, the Replicator won’t run any child activity and is limited to firing top-level events such as Initialized and Completed. You can initialize child activities using an object (not necessarily a string), including instances of custom classes. The Replicator also includes events to signal initialization and completion of each child activity. By default, child instances run in sequence; by setting the ExecutionType property, though, you can opt for a parallel execution. When a parallel execution is requested, all child activity instances get created before the replicator starts and executes on parallel threads. When working in sequential mode, the next activity is instantiated only when the previous has finished.

If no global condition is set through the UntilCondition property, the Replicator ends when all replicates have completed; otherwise, the activity terminates when the UntilCondition is true. Note, though, that the activity will hang if all the child activities have completed and the UntilCondition property evaluates to false; the Replicator never loops through the child activities like in a While loop. The UntilCondition is evaluated after the global initialization of the activity, after each child activity has completed, and after all included activities have completed. If, at any time, the condition evaluates to true, the Replicator will exit immediately.

You can mix together conditional execution and loops in the ConditionedActivityGroup (CAG) activity. The CAG contains a number of child activities (possibly composite activities) and runs them until a global condition is met. Basically, a CAG combines the behavior of While and IfElse activities. Its internal logic is expressed by the following pseudocode:

While condition
   If child1.WhenCondition Then child1.Execute
   If child2.WhenCondition Then child2.Execute
    :
   If childN.WhenCondition Then childN.Execute
End While

Each child activity has a WhenCondition property. Based on the evaluation of the specified condition, the activity is run or skipped in the current iteration. Note, though, that if the child activity has no WhenCondition set, it is executed only the first time and skipped for all subsequent iterations. All conditions are evaluated whenever required based state change dependencies.

The CAG activity terminates after the UntilCondition returns true and immediately cancels any currently executing activities. If no condition is specified, CAG completes when no child activities are running either because they have no condition set or the condition evaluates to false.

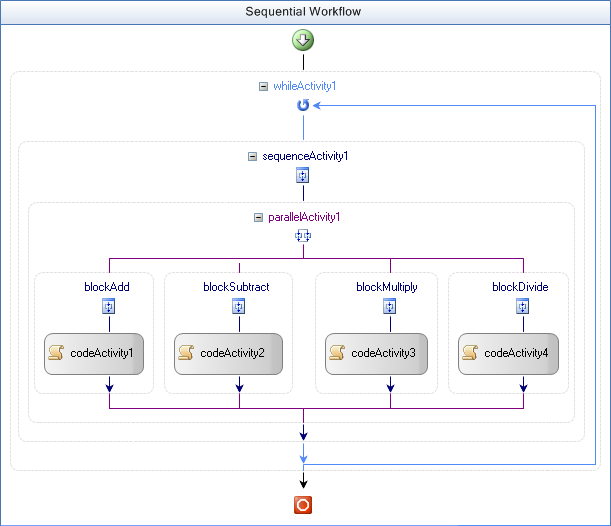
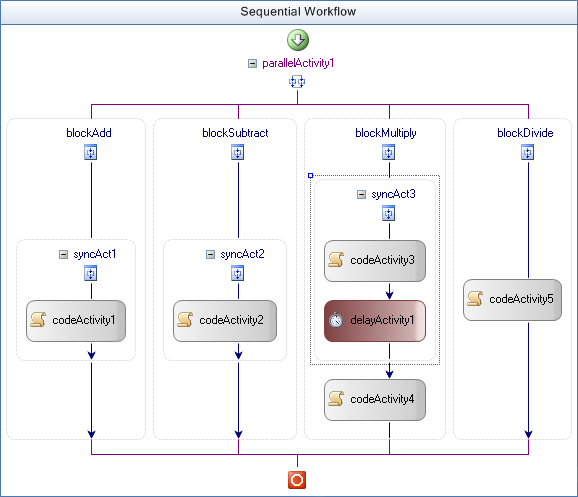
Synchronization Blocks


A sequential workflow that has no interleaved activities doesn’t bother about serializing access to shared members. However, operation is different when a Parallel activity is used with two or more sequences running in an interleaved manner. Take a look at Figure 3. The While activity contains a Sequence block which, in turn, chains Parallel and Code activities. Internally, the Parallel activity has four different blocks, each performing a mathematical operation on a number defined as a member of the workflow class. The four branches in the Parallel activity execute in an interleaved manner. (There is only one thread in a workflow instance at any one time. That thread switches back and forth between the branches of the Parallel activity.) What about cross-task synchronization? By default, each piece of code running inside any of the child activities will perform a direct access to the shared member.

Figure 3 Parallel Tasks

With the simple schema of Figure 3, it may happen that each parallel branch runs as an atomic operation. This would be purely coincidental, though, and strictly based on the complexity and the duration of each operation. What if each branch is made of multiple activities? SynchronizationScope provides a declarative and explicit way of modeling synchronized access of shared state within a given workflow instance across a set of activities.

The section of the workflow running inside a SynchronizationScope activity is a sort of atomic operation that can’t be interrupted. There’s no transactional semantics here and the operation wrapped up in the SynchronizationScope activity cannot be rolled back. The SynchronizationScope activity plays a key role in all solutions based on activities that have parallel execution paths, such as Parallel, Replicator, and CAG.

To quickly figure out the role of a SynchronizationScope activity, take a look at Figure 4, which represents a modified version of the workflow in Figure 3. The blockMultiply activity counts two code blocks interspersed with a delay. The blockDivide activity contains one code block with no synchronization. If you place the contents of the blockMultiply outside of a synchronization scope, the blockDivide will likely execute during the delay phase of blockMultiply. Depending on what kind of updates you’re making, this might be a serious issue. The SynchronizationScope activity safeguards the continuity of a section of the workflow.

Figure 4 Parallel Tasks and Synchonization Scopes


Exception Handling


Just as any other .NET-based application, a workflow can throw and catch exceptions. In particular, you use the Throw activity to throw a particular exception. The Throw activity requires a couple of settings—the type of the exception to throw and a workflow class member to store an instance of the exception object for further customization. You can use custom exception types as long as the type is referenced in the workflow project.

To catch exceptions thrown by workflow activities, you add a FaultHandler activity. The workflow designers provide a container for all fault handlers you add. Each handler is bound to a workflow section that executes as soon as the exception is caught. After adding the FaultHandler activity, you define the type of the exception to catch. You can access the exception object through the Fault property. Note that to visualize fault handlers you have to switch the view by using Activity’s drop-down menu.


Transactions


The .NET Framework includes an object to handle transactions easily and effectively—no matter the number and type of participant objects and the scope, local or distributed, of the transaction. The object is named TransactionScope and you typically use it according to this pattern:

Using ts As New TransactionScope
   …
   ts.Complete
End Using

The TransactionScope object guarantees that the transaction is either committed or rolled back in case of failure and, more importantly, it determines whether you need a local or distributed transaction and enlists any necessary resources. As the code reaches a point where it won’t be running locally, TransactionScope escalates to the Distributed Transaction Coordinator (DTC) as appropriate. Any objects that implement the ITransaction interface can be enlisted with a transaction. The list includes all standard ADO.NET data providers, while Microsoft Message Queue works in compatibility mode.

It is worth noting that there are a number of differences between TransactionScope and Enterprise Services as far as distributed transactions are concerned. TransactionScope belongs to a transaction framework designed specifically to fit .NET-based applications—System.Transactions. Internally, though, the classes of the System.Transactions namespace sometimes end up delegating some work to DTC and COM+. Why is TransactionScope important here? The TransactionScope Windows Workflow Foundation activity is just a workflow wrapper for an instance of the TransactionScope .NET class.

When you add a TransactionScope activity to a workflow, you can set the timeout for the transaction to complete and the desired level of isolation. All activities composed in the scope of the transaction form a unit of work that fulfills the classic ACID schema. When all child activities have successfully completed, the transaction commits and the workflow proceeds with the next step. The TransactionScope activity automatically rolls back if an exception is thrown from within the scope. Writing transactional workflows doesn’t require you to explicitly deal with commit and rollback semantics—you just let things go if you want to commit and throw an exception to abort. The activity will comfortably manage everything else.

Note that you can’t nest two or more TransactionScope activities. Likewise, you can’t suspend the workflow from within a transaction using the Suspend activity. Instead, you can incorporate event handlers in the transaction through either the Listen or the EventHandlingScope activities. In this case, though, the workflow host should include a persistence service, otherwise an exception would be thrown if the workflow attempts to save its state on idle.

A related activity, CompensatableTransactionScope, also supports compensation. Compensation is the process of logically undoing the completed transactions in case of any subsequent business exceptions. Compensation differs from rollback in that it is a way to cancel the effects of a successfully completed and committed transaction when a rule is violated later in the workflow. The typical example of a rollback is when you have a transaction that transfers money across two accounts. The first call withdraws money from one account and the second call adds the same amount to another account. As long as the database supports the two-phase commit model, the rollback restores a consistent state in case of exceptions thrown within the transaction.

Imagine an order processing workflow where a transaction is used to process payment through, say, a credit card service. At the first step, money is withdrawn from the credit card to pay for some goods. Next, after the transaction completed successfully, it turns out that the goods are no longer available for sale. Such a business rule violation requires that the results of the transaction are compensated with proper code—typically crediting money to the charge card.

By right-clicking on the CompensatableTransactionScope activity, you can switch to the compensation view of the transaction and add all the activities that would compensate the effects of the transaction. In Figure 5, the OrderScope transaction is associated with a compensation activity code that will refund any money withdrawn in case of a business exception. As I mentioned earlier, exceptions in the workflow are caught by an exception handler. For a given exception (say, ProductDiscontinued) you invoke a Compensate activity bound to the transaction activity whose effects are canceled. In general, the Compensate activity triggers the compensation mechanism for any activity that is compensatable—that is, for any activity that implements the ICompensatableActivity interface. Along with CompensatableTransactionScope, CompensatableSequence also implements this interface and can be used for nontransaction-based compensation scenarios – effectively this is the same as Sequence but with compensation support.

Figure 5 Transaction and Compensation Activities


Event Handling


The EventDriven activity is similar to the Sequence activity in that it contains a set of child activities that are executed in sequence.  However, for Blue Integrator Workflows the first child activity must be either a ReceiveMessage activity, a ReceiveSentMessageResponse activity, or a Delay activity.  A Listen activity is then a container for multiple instances of EventDriven activity, and as soon as the first child activity of one of the EventDriven  activities receives a message or times out (as appropriate) that full EventDriven activity sequence is executed and all other EventDriven activities are cancelled.  Using this mechanism a workflow can effectively listen for one or more messages with a timeout.


Calling Other Code


There are three other activities to invoke and execute code. They are Code, InvokeWorkflow, and InvokeWebService. The Code activity is the most flexible and represents a block of custom code you insert in the VSTA project – you add a handler by double clicking on the ExecuteCode event property.  The Code activity can call into an external assembly if required.

The base class provides a number of useful methods for logging, sending emails and accessing configuration data.  The function 
GetSetting allows you to access a named configuration property as defined in the Custom Properties section of the Blue Integrator Explorer under Static Settings.

The InvokeWorkflow activity takes a reference to a workflow and invokes it asynchronously. You can pass input parameters but be aware that the InvokeWorkflow activity completes before the launched workflow starts its execution. In no way can you synchronize the current execution with that of an external workflow or process the output parameters in the current workflow.

The InvokeWebService activity synchronously invokes a Web service method through a proxy class. The behavior of the activity can be simulated using a Code activity and calling a Web service from there.


Binding


The Workflow Designer supports binding, whereby Activity properties and events can be linked to other Activity properties and events, or to Workflow variables.  To use this function, click the blue binding symbol where present in the Properties form – it’s towards the right of the left-hand (property name) column.