Help
Blue Integrator Workflow Designer
Help menu
- Help content
- AS2
- Examples and Tutorials
- IO Queues and Forms
- Maps
- Schemas
- Send and Receive Ports
- Send and Receive Ports / Transports
- Servers
- Static Configuration
- Tracking
- Workflows
- Workflows / Workflow Activities
- Call Web Service Direct Activity
- Compensatable Sequence Activity
- Compensatable Transaction Scope Activity
- Compensate Activity
- Conditioned Activity Group
- Database Activity
- Delay Activity
- Event Handling Scope Activity
- Event Driven Activity
- Expression Activity
- Fault Handler Activity
- If Else Activity
- Increment Activity
- Invoke Web Service Activity
- Invoke Blue Integrator Workflow Activity
- Invoke Workflow Activity
- Listen Activity
- Map Activity
- Parallel Activity
- Policy Activity
- Send Receive Port Response Activity
- Replicator Activity
- Send Receive Port Response Activity
- Send Port Message Activity
- Sequence Activity
- Suspend Activity
- Synchronization Scope Activity
- Transaction Scope Activity
- While Activity
The Blue Integrator Workflow Editor allows you to define Workflows, to be invoked on receipt of a Message. It is launched by creating or editing a Workflow within the Blue Integrator Explorer.
The Blue Integrator Workflow Editor is grouped into three panes. The main Windows Workflow Designer Surface is on the left hand side. To the right, at the top, is the Toolbox Tab Control, allowing selection of either the Activity Palette or the Messages / Variables Tree. To the right at the bottom is the Properties form, which displays editable properties for any selected object.
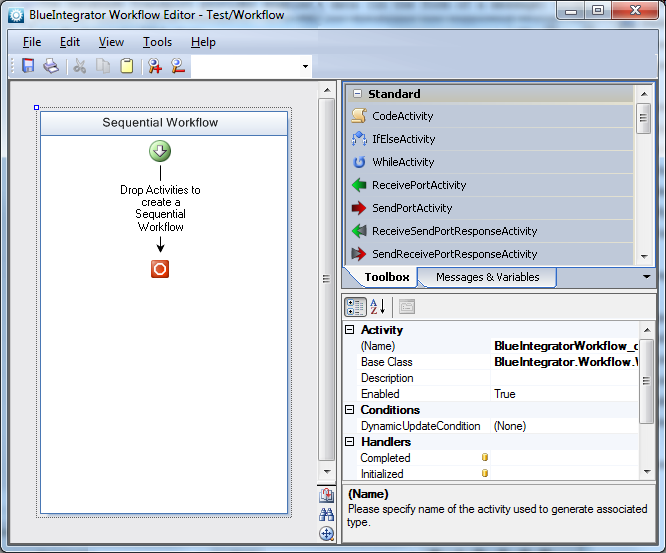
The Toolbox tab contains the set of Workflow Activities that can be dragged into to main Windows Workflow Designer Surface. These consist of those standard Windows Workflow Activities which are compatible with Blue Integrator, along with the specific Blue Integrator Activities detailed later in this topic, and any custom Activities registered with the Blue Integrator Explorer (under the Static Configuration | Custom Workflow Activities tree node). To construct a Workflow, drag one or more activities onto the main Workflow Designer Surface – the cursor will give feedback as to where Activities can be dropped.
The Messages and Variables Tree allows Messages and variables to be defined for the Workflow – these are then accessible for binding, and for access from VSTA.
Windows Workflow Designer Basics
See topic: Windows Workflow Basics
Specific Blue Integrator Workflow Activities:
- The Receive Message Workflow Activity
- The Send Message Workflow Activity
- The Receive Message Response Workflow Activity
- The Send Message Response Workflow Activity
- The Map Workflow Activity
- The Expression Workflow Activity
- The Call Web Service Direct Workflow Activity
- The Database Workflow Activity
- The Increment Workflow Activity
- The Invoke Blue Integrator Workflow Activity
Every Workflow, except where the Workflow is designed only to be invoked directly from other Workflows, must contain at least one Receive Message Workflow Activity, which will trigger the activation of a Workflow instance when a message is received at a bound Port.
Useful Menu Functionality
The Workflow editor supports full clipboard and Undo/Redo functionality. You can launch the Visual Studio for Applications IDE from the Tools menu at any time.
Advanced Workflow Constructs
See topic: Advanced Workflow Constructs
