Help
Configuring Blue Integrator For First Use
Help menu
- Help content
- AS2
- Examples and Tutorials
- IO Queues and Forms
- Maps
- Schemas
- Send and Receive Ports
- Send and Receive Ports / Transports
- Servers
- Static Configuration
- Tracking
- Workflows
- Workflows / Workflow Activities
- Call Web Service Direct Activity
- Compensatable Sequence Activity
- Compensatable Transaction Scope Activity
- Compensate Activity
- Conditioned Activity Group
- Database Activity
- Delay Activity
- Event Handling Scope Activity
- Event Driven Activity
- Expression Activity
- Fault Handler Activity
- If Else Activity
- Increment Activity
- Invoke Web Service Activity
- Invoke Blue Integrator Workflow Activity
- Invoke Workflow Activity
- Listen Activity
- Map Activity
- Parallel Activity
- Policy Activity
- Send Receive Port Response Activity
- Replicator Activity
- Send Receive Port Response Activity
- Send Port Message Activity
- Sequence Activity
- Suspend Activity
- Synchronization Scope Activity
- Transaction Scope Activity
- While Activity
After completing the installation of Blue Integrator, there are several tasks that need to be completed prior to using the system:
- License Blue Integrator
- Configure the databases
- Configure the Blue Integrator servers
Each of these steps is dealt with in more detail below.
Licensing Blue Integrator
To begin the licensing process, run Blue Integrator Explorer from the Blue Integrator group in the Start menu. If the software has not yet been licensed, you will be prompted to enter a license key.
You can obtain a trial license key from support@blueIntegrator.com , or purchase a full license key from order@blueintegrator.com or by Blue Integrator products.
Configuring the databases
After successfully entering a license code, you are prompted to select a Blue Integrator database. This is the repository that will hold the Blue Integrator data. By default, a single database is used for configuration, messaging and tracking data, although you can specify separate databases for messaging and tracking if required in your environment.
The following form appears:
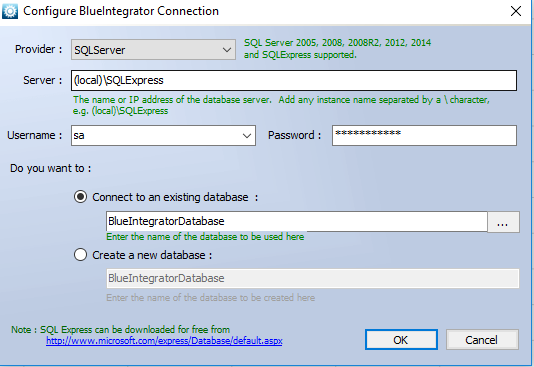
If you are running Blue Integrator for the first time, you will need to create a new database Blue Integrator currently supports SQLServer repositories only (SQLServer 2005 or 2008, 2012,2014, 2016,2017,2019 SQLExpress or MSDE). With both SQLExpress and MSDE you should take care to check that your tracking requirements will not exceed the 2GB size limit applicable to both of these platforms. If you don’t have an available instance of SQLServer, you can download SQLExpress free of charge from Microsoft via the link provided, and you should do this before proceeding.
Enter the server name or address, which can be (local)for the local machine, or (local)\SQLExpress for a local SQLExpress instance, or a resolvable server name or IP address (optionally with an instance name separated by a backslash. You also need to specify a name for the new database (which defaults to BlueIntegratorDatabase). You can also specify a username and password.
When you are ready, click OK to create the database and continue.
You can specify separate databases for messaging data and for tracking. To do this, select Static Configuration / Settings from the Blue Integrator Explorer tree, and then edit the MessageDatabaseConnectionString and TrackingDatabaseConnectionString properties under the DatabaseSettings header.
Configuring the Blue Integrator servers
The final stage in initial configuration configures a Blue Integrator Server. A Server is a Windows Service that performs work. Server roles include running Ports and Workflows and sending email. Receive and Send Ports are assigned to one or more Servers, and in order for Workflows to execute at least one Server must be designated to run Workflows. In order to send emails, at least one Server must be designated to send emails.
Each Server runs under a set of credentials, and these credentials determine the Server access rights. For example if a Server executes a File Receive Port, the credentials under which that Server runs will determine the files it can access. Multiple Servers can be defined per machine.
Blue Integrator should prompt you if no Servers are registered, and offer to help you define a new Server. Without a Server defined, Blue Integrator cannot do any work. The following form should appear, which can also be seen through the Servers node in the Blue Integrator Explorer:
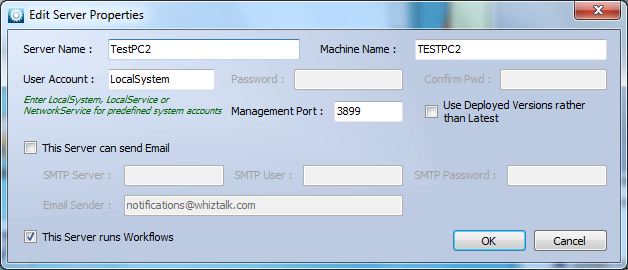
To register a new Server, give it a name, specify the machine on which it will run (which must have Blue Integrator installed and the Blue Integrator Management Service started), and specify a set of credentials. You should also specify SMTP details if the Server will send email, and specify whether the Server will run Workflows.
The Use Deployed Versions checkbox allows you to lock this server to running versions of Schemas, Maps and Workflows that are flagged as the deployed version. In this way a release Server can continue to run using a flagged version of a resource whilst that resource is being worked upon by developers. You specify the deployed version of a resource by using the Deploy button on the properties form shown on selecting the item concerned in the Blue Integrator Explorer tree.
It should not be necessary to change the Management Port number from the default of 3899 unless the Blue Integrator Management Port for the machine on which the Server will run has been modified. An alternative port for a machine can be specified at registry location HKEY_LOCAL_MACHINE/BlueIntegrator/ServicePort.
Click OK, and the Service is ready for action. Right click on the Server, and select Start. Your system is now ready for use.
